Sunday 27 April 2014

My 5 Favourite Makeup Products At The Moment

Benefit 'That Gal' Brightening Primer

I have recently fell in love with this product after using up a sample I received when I bought the Benefit 'Porefessional' Primer, as soon as I ran out of the sample I purchased it in full size. There is so much to like about this product; some of the ingredients in this primer are raspberry and camomile which gives it a gorgeous, refreshing fruity smell. The texture is like silk, it applies so smoothly and creates the perfect base for foundation. The primer does what it says on the label, it truly does brighten up my skin even when foundation is applied on top my skin in still glowing. Also it does the job of keeping my makeup in place. 'That Gal' is now my favourite primer and part of my everyday makeup routine. 


Chanel Perfection Lumiere 50 Beige 

I think I may have found my perfect foundation! As I have said before I have tried Chanel Vita Lumiere and Lift Lumiere, along with many other foundations and was dissatisfied with them, but this one is 'perfection'. It answers all my prayers when it comes to foundation; the coverage, colour, finish and durability tick all the boxes. Initially I thought that Perfection Lumiere might be too heavy for me as it is described as a full coverage and matte finish foundation. So I tried a sample first and found that the coverage is adjustable, meaning you can build the foundation up to create the coverage and finish to suit you. This and 'That Gal' primer are a perfect combination. 


MAC 'Painterly' Paint Pot 

This product creates the perfect smooth base for eyeshadow making it easier to apply and blend and prevents the eyeshadow from creasing and wearing off through out the day/night. I use this every time I apply eyeshadow.


MAC 'Pure Zen' Lipstick 

This semi sheer peach/pink lipstick is my favourite nude colour to date. It is the perfect everyday lipstick and also works with so many makeup looks. This lipstick is a Creamsheen formula, the finish is more like that of a lipgloss and is really moisturising. This teamed with MAC 'Dervish' lip pencil is my go-to at the moment. 


MAC 'Mulch' Eyeshadow 

The colour 'Mulch' is described as 'red brown with bronze pearl'. One of the reasons I love this eyeshadow is because I think it makes my green eyes 'pop'. Like most MAC eyeshadows it is well pigmented and so easy to work with and blend.  
This colour is so easy to work with, it looks gorgeous on its own applied all over the lid and below the lower lash line, I wore this last week and it reminded me of a Mila Kunis eye makeup look I had seen. This colour also works with so many colours, I use it alot in the outer corners teamed with colours such as MAC 'All That Glitters' or 'Patina'. I find myself referring to this colour a lot and it is definitely one of my most used colours in my palette. 


In the following images I have incorporated 'Mulch' in to 2 eye looks...

1. 
MAC 'Painterly' Paint Pot
MAC 'All That Glitters' eyelids
MAC 'Cork' in crease and blended out
MAC 'Mulch' outer corners and lower lash lines
MAC 'Shroom' inner corners and brow bones
MAC Liquidlast Liner 'Point Black' top lash lines and water lines
HD Pro Eye and Brow Pro Palette 'Medium Brown' brows 


2.
MAC 'Painterly' Paint Pot
MAC 'Mulch' eyelids and blended slightly above crease and on lower lash lines 
MAC 'Wedge' used as a transition colour above crease to blend out 'Mulch' 
MAC Liquidlast Liner 'Point Black' water lines

Thursday 10 April 2014

Tan Truth Spray Tan Review


I have tried so many spray tan solutions since getting a spray tan machine and even before that I use to treat myself to a spray tan once in a while when I was going somewhere special. Now I have a spray tan near enough every week, its so much easier to jump in the tent and be sprayed rather than applying a lotion or mouse, rubbing it in, making sure its even and struggling to reach your back, it seems to take forever! However a spray tan is done in under 10 minutes and all it takes for the best results is a little moisturiser applied to the dry areas (hands, feet, elbows, knees) to prevent the tan building up on the dry skin and someone you trust with a spray gun! Of course preparation is key as it is with any tanning product, you must exfoliate and shave at least 24 hours before tanning for the best results. You can't expect a fresh even tan with dry patches and traces of last weeks remaining tan (but us beauticians try our best under all circumstances). A few other spray tan top tips are to wear a hair net to prevent your hair from the tan, 'sticky feet' to prevent the soles of your feet from the tan when stood in the tent and also giving the palms of your hands a little wipe after the spray tan.
With that said you can probably tell what is my favourite tanning method and it goes with out saying that we should all keep off sun beds or at least use them in moderation. 
In the past I have bought spray tan solutions from various brands including Sienna X, Famous Dave, Laurens Way and Sol Glo and some of the tans I have had from other salons include Fake Bake and California Tan.
I have never had a really horrible spray tan, however with most I have thought there could be room for improvement but for me, Tan Truth is an all rounder! 
Tan Truth has so many benefits, not only do you get the gorgeous tan you long for but its with out all the dreaded side effects. First of all,  this is the only spray tan where I have felt dry enough to get in to my clothes just minutes after being sprayed and when I am dressed I don't feel like my clothes are clinging to me, so many of my clients have commented on this. Another thing I use to hate about spray tans is when you sleep in your tan over night and you wake up the next morning and feel so dirty and you just want to jump in the shower as soon as you get out of bed, with this tan I feel like I have nothing on my skin, I feel quite fresh but of course I feel even better when I wash it off to reveal a perfect streak free tan. When people think of any tanning product they think of the smell, but again I must say this tan wins in this field! Of course it does have a scent but its not strong or unpleasant and the smell isn't left lingering on your bed sheets like other tans. Another problem I have had with spray tans is those 2 hour baths I have found myself in, struggling to remove the tan, but not with this one! This has been the easiest to remove of all I have tried. You also get your weeks worth with this one, most tans are said to last up to a week but I have found some tans fading after just 2 days, most around 4-5 but I would say Tan Truth starts fading after 6 days. I have also never found myself with that scaley and patchy skin you get when the tan is wearing away. One of the main things I love about this tan is the colour. Most importantly its not orange, orange is not a good look! I think this tan is really natural looking, it has that holiday feel, I would describe it as a golden bronze and sun kissed. 
There are 2 shades of this tan 9% which is described as the ultimate natural, golden tan and 13% a deeper, darker tan. I would recommend those who are new to spray tans to get the 9% and for myself I prefer this as a day to day tan. If I was having a night out I would go for the 13% and I would advise all the tan lovers to get this too! 
After trying and testing in search of the tan I thought was best for me and my clients Tan Truth was the winner, it won in every field! Its great value for money and all my clients have been happy with their tan and I have had lots of recommendations and returning customers. 

With my 13% dark Tan Truth spray tan 
Full Outfit - Chic Boutique Darlington 
Shoes - Bank

So if you haven't tried it, book your Tan Truth spray tan now at Rose Beautique Darlington! 

Tuesday 8 April 2014

Makeup Tutorial Inspired By Lucy Mecklenburgh 80s Look

This makeup look was inspired by Lucy Mecklenburghs Superdrug campaign for Dare magazine. Lucy had been given an 80's style makeover for the photo shoot, she also modelled several other looks channeling different decades to celebrate 50 years of Superdrug. My friend saw a behind the scenes picture which Lucy had posted on Instagram and asked me recreate this look on her for a night out, when I saw the picture I couldn't wait to recreate Lucys gorgeous makeup.


I will mention, everyone has different shapes eyes, Lucy has very round eyes where as my friend has more almond shaped eyes so I adapted the look to suit her. Here are the pictures of the finished look...


Here I am going to explain how I created the eye makeup...

I always begin with the eye makeup, that way if there is any fall out I can easily wipe it away with out having to worry about reapplying foundation. 
  • Apply MAC Painterly paint pot all over the lid and the brow bone, this works as an eye primer 
  • Apply MAC' Expensive Pink' eyeshadow on the eyelid only
  • Take MAC 'Cork' eyeshadow through the crease and slightly over, I used this as a transition colour to create more depth 
  • Begin applying MAC Beauty Marked eyeshadow in the crease and outer V, I start with a little eyeshadow and build the colour up so I can create the right shape.
  • Take a fluffy eyeshadow brush and blend 'Cork' and 'Beauty Marked' together so the colours transition smoothly
  • Apply MAC 'Shroom' eyeshadow on the brow bone, this 'lifts' the brows
  • Apply MAC 'Gleam' in the inner corners, this gives the illusion of bigger eyes
  • Apply MAC Liquidlast eyeliner along the top lash line, from the very inner corners and making it thicker towards the outer corners then create a flick. 
  • Apply the same eyeliner on to a clean eyeliner brush and apply the colour along the waterline
  • Take 'Beauty Marked' again and apply it along the lower lash line 
  • Fill in the brows with HD Brows Pro Eye and Brow Kit, I used the colour 'Deep Brown' from the palette. 
  • Apply false eyelashes, the ones I use are unbranded bought from Ebay 
  • Apply mascara to bottom lashes and top lashes to blend in with false lashes


Full list of makeup used 
Eyes 
MAC Paint Pot (Painterly) 
MAC Eyeshadow: Expensive Pink, Cork, Beauty Marked, Shroom, Gleam
MAC Liquidlast Eyeliner (Point Black)
HD Pro Eye And Brow Kit (Deep Brown)
Estee Lauder Sumptuous Extreme Mascara (Extreme Black)

Face 
Clarins Beauty Flash Balm
Clarins Instant Smooth Perfecting Touch
Clarins Everlasting Foundation (Amber 112)
Rimmel Wake Me Up Concealer (Ivory)
MAC Studio Fix Concealer (NC 30) (for under eyes and blemishes) 
MAC Studio Fix Concealer (NW 35) (for contour on cheek bones, temples, jawline and nose)
Rimmel Stay Matte Powder (Transparent) 
MAC Mineralize Skinfinish (Dark) 
Sleek Makeup Blush (Flamingo) 

Lips
MAC Pro Longwear Lip Pencil (Shock Value)
Clarins Joli Rouge Lipstick (713 Hot Pink)

Friday 4 April 2014

My Top 10 Makeup Brushes


Listed below in no particular order are my Top 10 makeup brushes, of all my brushes these are my favourite and most used! 


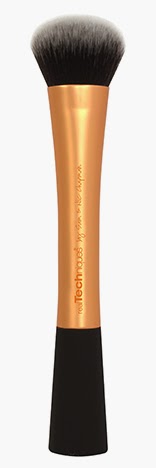
Real Techniques Expert Face Brush - This is the brush I use to apply my liquid foundation. The brush is really firm and broad making application easy and I can use the brush to really buff the product in to my skin so that my foundation feels really light weight and it doesn't feel as if it is laying on top of my skin. This brush makes blending in foundation easy and I'm not left with any harsh lines or brush marks. After using this brush my skin looks and feels flawless. 


Real Techniques Stippling Brush - I use this brush to apply my setting powder.  This brush picks up just the right amount of product, I use the brush to dust and buff the product lightly over my foundation, concentrating on the T zone area and under my eyes to set my concealer. This brush could also be used to apply foundation or other powders.


Real Techniques Contour Brush - This brush comes in the 'Core Collection'. As you can imagine I use this brush to contour, I use bronzer or a dark coloured concealer and apply around my cheek bones, temples, jaw line and down the sides of my nose. This brush is the perfect size for contouring. 


Real Techniques Detailer Brush - This brush is also part of the 'Core Collection'. The detailer brush has many uses it can be used to conceal problem areas, to apply lipstick for long lasting shape and definition or for eyeshadow application. I apply my brow bone and inner corner highlight with this brush, its the perfect size for fitting in those small areas. 


Real Techniques Deluxe Crease Brush - This brush comes from the 'Starter Set' which consists of 5 eye brushes. I have 2 of the starter sets so I use my 2 deluxe crease brushes for different purposes. My favourite way to use this brush is for concealer, I use it to really buff the concealer in to my skin instead of having it lay on top of my foundation. I use my other brush in my crease which is the main purpose of this brush. 


Real Techniques Duo-Fiber Eye Brush - This brush is part of the 'Duo-Fiber Collection'. I have a selection of brushes which I use in the crease and to blend eyeshadow. I like to use this brush for a light flush of colour in my crease when I am going for really soft smokey eyes or a day time look. 


Real Techniques Shading Brush - This is my favourite brush to use in the crease when I am going for a more defined look. With this brush I can get right in the socket to create definition which is great when I am creating a 'cut crease'. I will then blend out the colour with a blending or shading brush. 


MAC 217 - This is the ultimate blending and shading brush, a makeup artist must have! This fluffy brush blends eyeshadows together flawlessly allowing the colours to transition smoothly. This brush, along with other MAC brushes are on a bit on the pricey but a pleasure to work with! 


MAC 275 - I use this brush to apply my base eyeshadow, this brush really packs on the product giving me a beautiful and even base colour to work with. This brush can also be used for shading and blending.


MAC 212 - This is a flat liner brush, it can be used with powder, liquid or cream products. I like to this brush to apply liquid liner on clients but for myself I use this to apply colour under my lower lash line, usually with eyeshadow. This brush provides colour in one stroke and gives instant definition. 


I cannot recommend Real Techniques enough, I have recommended these brushes to so many people. They are by far my favourite brand of brushes. Real Techniques have a huge selection of brushes which is always expanding. The brushes are fantastic quality, they are so soft and feel gorgeous on my skin and I have never found the brushes shedding, even after washing the brushes several times. I would say these brushes are a very reasonable price and great value for money. The brushes are created by makeup artist and one half of YouTubes 'Pixiwoo' Samantha Chapman. I am subscribed to Pixiwoo on YoutTube, I love to watch Sam and her sister Nic who is also a makeup artist. They do gorgeous makeup tutorials and are 2 of my favourite youtubers. Its good to know whose behind the products I am using! Find all these brushes at www.realtechniques.com and check out Sam and Nics tutorials at www.youtube.com/user/pixiwoo

I am not a fan of MAC face brushes as I find the hairs shed and after I have used these brushes I find my self picking the hairs from my face. However I can't say the same about the eye brushes. These brushes are more on the pricey side and I'm sure I could find of dupe for these brushes which are a lot cheaper, but I have had some of my mac eye brushes for a long time and they are still in great condition after being washed and obviously the products are made from high quality materials. Overall the brushes do the job they're suppose to do and they do it well. Find these MAC brushes at www.maccosmetics.co.uk


Don't forget to clean your brushes!

Jennifer Lopez In Pink

3 weeks ago Jennifer Lopez stepped out in a hot pink top and crop jean combo paired with nude point court heels and a big bouncy pony tail. I think its one of those you either love it or hate it outfits but I love it!  


Jennifer got papped again yesterday wearing another bright pink ensemble; a gorgeous short floaty playsuit with a gold chain resting around her waist, a chunky gold necklace and what looks like another pair of points. I think J.Lo's hair really compliments the outfit, I love the soft beachy waves. This is a perfect day to night look! 


 ...And those aren't the first times J.Lo has been spotted wearing all pink everything! 

J.Lo in another hot pink ensemble back in 2012, here she is wearing a Michael Kors gown with a thigh high slit. She tones down the look and pairs with simple accessories, delicate black sandals and a sleek ponytail.


Also in 2012, here she is at Paris Fashion attending the Valentino show. She wore a pink bow accented flouncy dress paired with a studded black clutch and sparkling silver heels, all by Valentino. 


It looks like J.Lo might love pink as much as I do! 

My Current Everyday Makeup Products (Reviews and Ratings)

On a normal day my makeup is pretty simple, heres a list of the products I use...

Benefit The Porefessional Primer - I have tried a few primers from different brands and haven't been impressed but to date this primer has been the most satisfying. I think it does the job of keeping my foundation in place although I feel that I still need to top up with a little powder through out the day as I have oily skin. I bought this product because I wasn't happy with the way my foundation was laying on my pores in my T zone, I felt like I needed more coverage so I bought this product hoping it would do the trick and it does! However when I run out of this product instead of repurchasing I want to try the Benefit Stay Flawless primer to wear with the Stay Flawless foundation which I have used up and will be repurchasing. 8
/10

http://www.benefitcosmetics.co.uk/product/view/the-porefessional?ext_id=ppc_1567&gclid=CPOFn5LDxb0CFWsTwwod6YwAGg


Chanel Vitalumiere Foundation (40 Beige) - I came to use this after borrowing my mams foundation (Chanel Lift Lumiere 50 Naturel) when I ran out of whatever foundation I was using at the time. When I tried Lift Lumiere my mam said it suited me and it was the best foundation she had seen on me. So I bought it for my self and used it for a while, but the problem I had with this foundation was that when I had a spray tan on my face I found the colour looked a little ashy and grey because it didn't match my skin tone. So the next time I went to the counter I got the colour a shade lighter and changed to Vitalumier which is the equivalent for younger skin. For a while I thought this was the perfect foundation for me and although I like the colour I find it to be a bit oily, I need to use a lot of setting powder with this product and I have to continuously apply it through out the day otherwise I feel like the foundation would slide off and as I said previously the coverage in my T zone is not great. So I am still on my quest to find my perfect foundation, I would like to try Chanel Perfection Lumiere and I would also like to repurchase the Benefit Stay Flawless Foundation. 7/10

http://www.chanel.com/en_GB/fragrance-beauty/Makeup-Foundations-VITALUMI%C3%88RE-95640?sku=95647


MAC Pro Conceal and Correct Palette (Medium) - I couldn't live with out concealer! I have dark circles under my eyes which are hereditary and obviously me being a night hawk doesn't help. Therefore concealer is very important in my make up routine, luckily I don't get spots often so I do only use it under my eyes. I think this product is fantastic because your getting 4 shades of the MAC Studio Finish concealer plus 2 corrector shades for the price you would pay for 2 of the same concealer in a single shade. Firstly I use the mid peach corrector in the palette to cover and brighten the dark circles, then I apply NC 30 over the top so it blends in to my foundation. The darker shades are great for contouring. I am happy with the coverage and the concealer and corrector combined are the best products I have came across for covering my dark circles. I will repurchase this product but I'm always looking for something even better. I would like to try the MAC Prep and Prime Highligher to use with this product to brighten and highlight under my eyes more. 8/10

http://www.maccosmetics.co.uk/product/157/23772/Products/Face/Concealer/PRO-Conceal-and-Correct-PaletteMedium/index.tmpl


Rimmel Stay Matte Pressed Powder (Translucent) After hearing MUA Tanya Burr recommend this product so many times on her youtube channel and saying it is the only setting powder in her makeup kit, I had to try it for myself. This product does exactly what its suppose to and works well with all the foundations I have used it with. I apply this after foundation and concealer and use it to touch up during the day. At only £3.99 this is the cheapest product in my makeup kit and I will definitely be repurchasing. 9/10

http://uk.rimmellondon.com/products/face/stay-matte-pressed-powder


MAC Mineralize Skinfinish Natural (Dark) - I use this product as a bronzer and to contour. I contour around my cheek bones, temples and jawline and I also dust the product lightly over my chin and forehead and blend down my neck. I would say this product is long lasting but I like to reapply through out the day to keep me looking sun kissed. As for the colour it can sometimes look a little orange if too much is applied. I have repurchased this item probably 4 times in different shades, I have previously used a lighter shade as a setting powder which I would also recommend. 8/10

http://www.maccosmetics.co.uk/product/shaded/159/1343/Products/Face/Powder/Mineralize-Skinfinish-Natural/index.tmpl


MAC Powder Blush (Dollymix, Fleur Power, Pink Swoon) - First of all, these blushers last forever, a little goes a long way as these powders are SO pigmented. I can't remember the last time I used another blusher. All these blushes are shades of pink (my favourite colour) Fleur Power and Pink Swoon are more muted and have slight peach tones, these are the colours I use most. Dollymix is a bright pink, it is one of the most popular MAC blushes, I like to wear this when I want more colour in my cheeks and when the rest of my makeup is quite plain. I love these blushes so I would repurchase these, however I would like to try some different shades. I would definitely recommend! 9/10

http://www.maccosmetics.co.uk/product/shaded/156/329/Products/Face/Cheek/Powder-Blush/index.tmpl

HD Brows Pro Eye and Brow Palette - I bought this product before Christmas and unfortunately the exact product I have is not available on the HD Brows website any longer, however there is a very similar product 'New Eye and Brow Palette' that will do the same job. I started filling in my brows last year and now I couldn't go out with out fixing them, its true, brows frame your face and eyeshadow looks much better when you have good brows. With this product I found the perfect shade of powder to match my brows so they still look natural and I get a lot of compliments on them. My natural brows have a good arch so I just use the powder to expand the brows inwards and outwards. I use the angled end of the brush that comes with the kit, its the perfect brow brush! I'm really happy with this palette, the powders are very pigmented and good quality, and I love to use the other shades for creating a smokey eyeshadow look. Again with me having quite oily skin I like to touch up my brows when I can. If I needed to repurchase this product I would get the 'Foxy Palette' which would be my shade in the updated palettes. If you are obsessed with your brows you should try this fantastic product! 10/10

http://hdbrows.com/new-eye-and-brow-palette.html

MAC Liquidlast Liner (Point Black) - I feel bare with out eyeliner, I wear it everyday! This liner is perfect because it lasts all day and there is no smudging. All I can say is be careful when applying this product because if you make a mistake it is difficult to remove. When it comes to the 'feline flick' remember practise makes perfect. I'm now on to my third tube of this, I wouldn't use another eyeliner! 9/10

http://www.maccosmetics.co.uk/product/shaded/151/1250/Products/Eyes/Liner/Liquidlast-Liner/index.tmpl

Barry M Lash Vegas Mascara - I have to praise Barry M as there waterproof mascaras are the only mascaras I have found to actually be waterproof. I have tried so many other mascaras that claim to be waterproof and I have been left with black circles under my eyes where they have smudged. Luckily this mascara also lengthens and thickens my lashes so it is an all rounder! However I must mention I really dislike the packaging as it is really cheap looking and bad quality, but what can you expect for the price. 9/10 

http://www.barrym.com/lash-vegas-waterproof-mascara.html


MAC Lip Pencil (Dervish) - I only recently started wearing lip liner. I draw slightly over my lip line to make my lips appear fuller. I like the colour of this product, its pretty much the same colour as my lips so it looks really natural and can be worn alone. However this product isn't long lasting and it wears off easily. I don't think I would repurchase instead I would like to try the MAC Pro Longwear Lip Pencils. 7/10

http://www.maccosmetics.co.uk/product/shaded/167/340/Products/Lips/Lip-Pencil/Lip-Pencil/index.tmpl


Avon Ultraglaze Lipgloss (Pink Watermelon) - I usually use MAC lipgloss because the colours are gorgeous but I have been using this lipgloss for a while after receiving it as a free gift with another Avon product. I love the colour for an everyday look and it feels really light on my lips and not sticky at all! 10/10

http://avonshop.co.uk/product/make-up/lips/avon-ultra-glazewear-lip-gloss.html


I don't have a recent picture of my everyday makeup but the picture above is close enough. In this picture I am wearing all the products listed above as well as eyeshadow from my MAC pro palette (Patina, Wedge, Shroom) and the Rich Brown shade from my HD Pro Eye and Brow palette.


I'm wearing: 
Blazer - H&M 
Top - Chic Boutique Darlington 
Earrings - H&M

Thursday 3 April 2014

Rose Beautique Darlington

I began studying Beauty Therapy at Darlington College when I was 17, I went to college for 2 years. For the first year I studied Level 2 Beauty Therapy , after passing the course I was qualified in facials, manicures, pedicures, waxing, eye treatments and makeup application. Along side the course I also done some extra training with enrichment courses and received certificates in Fake Bake spray tanning, Dermalogica facials, Minx nails, Art Deco makeup, OPI manicures and Swarovski manicures/pedicures. For my second year at college I studied Nail Technology and trained to do acrylic, gel polish and gel sculpture nails as well as nail art and nail air brushing. 
When my time at college came to an end I must admit I felt lost, I didn't have a job at the time, but I had an idea in my head. It had always been in my interest to run my own business and be self employed. so while I was still at college me and my mam began designing my 'salon' in the conservatory at home. There wasn't a whole lot of work that needed to be done other than redecorating but I had a lot of tools and equipment to buy. It was ready for a while before I opened it to the public, it took me a while to pluck up the courage to start advertising, but in September last year I made a page on Facebook and I also promoted on Twitter and Instagram. I wasn't sure how well I was going to do but over time my clientele has built up and I have regular clients, who have spread the word and I have new clients coming all the time. I am so happy with how it has turned out and I have high hopes for the future. 


My business cards, I love the design they match my salon perfectly!

Gelish nails by me

Gelish in 'Make You Blink Pink'


Gelish in 'All That Glitters is Gold'

First Post

My name is Rose Craddock, I am 20 years old and from Darlington in the North East. I am a qualified beautician and nail technician, I am also trained in spray tanning and make up. I work from my salon at home where I carry out lots of beauty treatments, I named my salon Rose Beautique. The beauty and makeup industry is my passion, I love what I do! 
This is probably the 5th blog I have started but this time I'm really going to go for it, I follow a lot of people's blogs who have similar interests to me and I've always thought I would like to do that, so it starts now! As you can imagine this blog is going to be beauty related but theres also going to be a lot of fashion talk because clothes, shoes, bags and jewellery are amongst the other things I love.
I've got so many post ideas in my head right now so I may as well get started...
I hope you enjoy reading my blog and don't forget to leave your comments, thank you! 
Rose x


I'm wearing:
Jumper - H&M
Jeans - River Island 
Jacket - Zara 
Shoes - River Island 
Bag - Louis Vuitton 
Necklace - Juicy Couture